1 Cakes & Louie: DIY
Showing posts with label DIY. Show all posts

Wednesday, January 22, 2014

DIY Memories

I spotted a "designed recipe" on a blog ages ago, pinned it, and promised myself I would find the time to do something similar with my late grandma's infamous top secret cheesecake recipe someday. I'm not sure what hit me, but this Christmas I finally decided it was time to get it done, and thanks to the billions of free fonts I've downloaded over the years I'm pretty happy with how it turned out! I framed a print for my dad for Christmas and also gave a copy to my aunt and uncle. A third copy is framed on my kitchen cart, and I love how it makes me think of my grandma and smile every time I see it. I was pretty flattered that our realtor told me "do NOT pack that away - it's beautiful and needs to stay out for showings!" And since I really am proud of how it turned out, I wanted to post it here.

Here's the thing though - I'm not kidding when I say this recipe is top secret. My aunt is the keeper of the recipe and has a rule that you don't get a copy of it until you own a house. Needless to say, when she handed me a little index card with the recipe on it 5 years ago in this little home of ours, THAT was when I felt like a true homeowner. So, since the recipe is super top secret, I changed a bunch of the ingredients to absolutely ridiculous amounts in the version I'm posting here. I know, I know, that's a little bit cruel, but if you have any secret recipes in your family I'm sure you understand! And if you don't, well then let me know when you want to visit and I'll make the cheesecake for you with the real ingredient list. But until then, DO NOT try and make this at home. I have no doubts it would be an absolute disaster.


If you have a family recipe that you'd like designed, please get in touch to discuss pricing. I truly enjoyed putting this together for my family and would love to design more of them in the future!

Tuesday, January 21, 2014

Wingbacks

One of the things our realtor and the stager both suggested we do at the house before photos and showings was to swap Dan's oversized recliner in the living room out for a slimmer, smaller chair. Cue a big "womp womp" from the hubby. While I was admittedly a little excited about this because the chair is not my favorite thing in the world (although I will admit it IS super comfy), Dan was totally crushed. Hopefully our new house will have the perfect spot for a man cave so he can have his favorite chair back... but in the meantime, I needed to find something to fill in.

I usually exercise a strict "no fabric" rule for craigslist, but needing something quick and affordable and knowing that I specifically wanted a wingback chair meant making an exception... and I'm glad I did. Not only did I find a chair, I found a pair for a measly $50! 


Thankfully, my mom is always up for an adventure, so she made the hour long ride with me to pick them up a couple of weekends ago. One is currently sitting as-is in the living room for showings while the other is in the basement, but seeing as the fabric is not exactly my style, I obviously have big plans for them in the future!

My mom and I have kicked around the idea of trying to DIY reupholstering the chairs down the road, which means finding the perfect fabric. I absolutely love finding a great deal on a piece of furniture to have some fun with, and I'm planning on doing just that with my new chairs! I definitely plan on picking something bold with lots of color that can fit into almost any room, but in true form I'm also somewhat drawn to more simple and neutral choices.

Here are some favorites from Fabric.com, Fabricworm, and LS Fabrics -

Monday, August 12, 2013

And Some Picklesssss

In the last couple of years, I have developed a strange obsession with pickles. Specifically, the half-sours from Ted's Montana Grill, which has a location right by FIL's house. A couple months ago, I learned (by asking, duh) that I can buy little to-go containers of the pickles for a whopping 50 cents each, and needless to say I've stopped in plenty of times since to buy a bunch. I've always liked pickles, but I promise you these things are on a completely different level. And every time I mention Ted's pickles, Dan quotes the Dane Cook Burger King skit, hence the title of this post.

Fast forward to this past Saturday when I suckered the hubs into going to the Farmer's Market in search of sugar snap peas. I didn't find what I went for, but I did come home with a huge bunch of basil, a GIANT zucchini, green peppers for my dad, cherry tomatoes, peaches, an assortment of baby potato varieties that we love to throw on the grill in a foil packet with my favorite Stephanie Izard rub, aaaaaand... a bunch of dill and a bag full of pickling cucumbers! It was DIY time in the kitchen, people. And it was fantastic.

The pickling cucumbers were only 50 cents each. I originally bought 3, but ran back up to the Farmer's Market for 4 more in a fit of excitement.


My helpful hubby cut all the cukes into spears for me, knowing I would likely slice my finger open trying to do so.


Meanwhile, I was prepping my mason jars with one finely chopped clove of garlic and a few sprigs of dill each.


After chopping an extra half inch or so off of each spear so they fit, I packed them into the jars.


Then poured over a brine of kosher salt, water and vinegar, and added a few more sprigs of dill to the top.


YUM. Six jars of pickles that I couldn't believe I had to wait 2 days to eat.


Ok, so I totally didn't wait 2 days to eat them. Who's surprised? I taste tested one that evening and it was good, but not outstanding yet. But I brought a full jar over to FIL's yesterday (about 24 hours after making them) and polished the entire thing off with the help of him and all 3 nieces. SO GOOD. I ate another (abundant) helping with dinner tonight and they honestly just keep getting better. I'm planning to take some to the parentals tomorrow to share, and I definitely need to see the bestie in the next couple of days because she happens to appreciate pickles as much as I do. Thankfully, even with lots of sharing I should have a few full jars all to myself, and I assure you that makes me a very happy camper.

The actual recipe I followed was from my favorite - Annie's Eats - and it was a perfect coincidence that she just posted this recipe a few days ago. The measurements for the brine in Annie's post was enough for 4 jars, but it took less than a minute to make another batch for my last 2 jars. If you're a fan of pickles I would 110% recommend making some yourself as soon as possible! Happy pickling :)

Monday, June 10, 2013

DIY: Chalkboard Greeting Cards

I bought a pack of plain white cards and envelopes at a craft store ages ago, and have used them randomly throughout the years for various occasions. I decided to get a few of them out recently and make them cute but still easily personalized - with chalkboard paint!

I was super excited when chalkboard paint became available at Michael's in the little 99 cent bottles. It's not too heavy so it didn't make the cards warp, and it painted on nice and smooth with a small flat brush.


Thursday, June 6, 2013

Little Things: Front Porch Storage

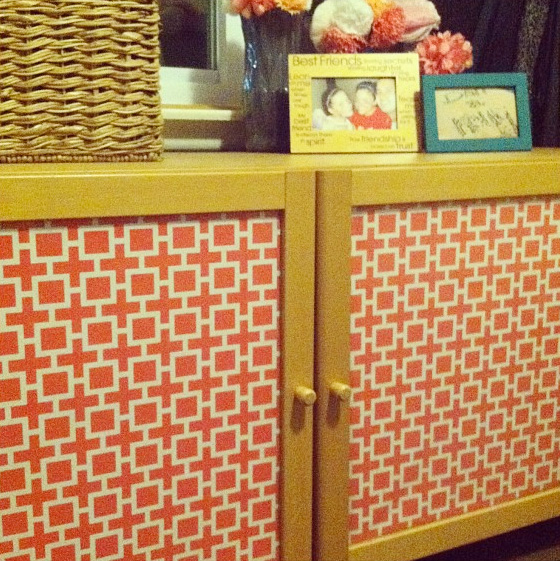
When I posted our front porch makeover reveal, it drove me crazy when I realized how see-through the frosted panels were on our storage cabinet where we keep all of our board games and a bin full of shoes.


While everything is nice and contained, it still looked messy to me because of those panels. So, I found a fun roll of wrapping paper at my mecca (Target) and sweet talked the hubs into helping me measure it all out using the largest straight-edge we could find (I really need to buy a yardstick). After cutting 2 even pieces we just used little squares of double-sided tape to secure the paper to the insides of the doors. I've already had to add a couple new pieces after a humid day, but I'm hoping overall this holds up. I of course did this little project well past my bedtime a few nights ago, so I wasn't about to get out the good camera for a new picture. Instagram to the rescue!


For $4 and less than 20 minutes, I'd say this is one of the simplest projects we've ever done with so much impact. High fives for easy upgrades!

Monday, May 13, 2013

DIY: Terrarium

I grabbed a terrarium on clearance at West Elm last year with hopes that it would be a foolproof way for me and my lack of a green thumb to have some plant life around the house. Thanks to a sale on succulents at Home Depot a couple weeks ago and a little patience, I am officially testing out the theory that cacti are nearly impossible to kill. We'll see. They are super cute though, aren't they?


I started with a layer of pea gravel at the bottom of the terrarium, and layered regular old top soil over that. Then I just arranged the little succulents in there however I liked and made sure they were "secure" with a little more soil. This was tough given that I apparently have fat hands and could barely get them through the little hole at the front of my terrarium, but I managed. I think I may need to redo the whole thing at some point since the aloe plant is already squished in there and has no room to grow, but we'll see how bold I get. I'm not even entirely sure this qualifies as a DIY exactly, but I'm gonna go with it. If you would like a more defined tutorial, check out this one from Making it Lovely! The fine folks over at West Elm themselves suggested it to me via Twitter (does anyone else freak out when brands tweet at them or is it just me?), and since I've been a fan of Making it Lovely's for years I knew it would be good.


Here's my final product sitting pretty on the front porch!


Happy Monday all! Hope you showered your mom with lots of love yesterday!

Friday, May 10, 2013

DIY: Heart Print Jeans

Well I'm getting all kinds of acquainted with little foam paint brushes and fun paint colors this week aren't I? Tonight, with the help of the kid sister, I decided to tackle something I've been wanting to try for quite some time - DIY "printed" jeans. And, thanks to my obsession with buying the $10.50 jeans at Forever 21 in bulk, I had 3 pairs of the exact same pants which meant one of them clearly needed a makeover. This project was so easy and fun that the other two pairs may be getting changed up in the near future as well.

Fair warning - this is one of those posts where you're just going to have to deal with every single picture having different coloring. I swear I will learn to use my camera properly someday.

Step 1: Grab yourself a pair of $10.50 Forever 21 jeans, lay them out on a flat surface and shove some thin cardboard in the legs.


Step 2: Fold a piece of heavy paper in half and cut out a cute little heart. Or cut out 4 cute little hearts before you get one you're happy with like I did.

Step 3: Hold the stencil down good and flat on your jeans and use a little round sponge brush to dab on some paint. I went with gold since I thought white was boring but gold was still acceptable (well, as acceptable as gold hearts on jeans can be for an almost-31-year-old). Don't use too much paint or there's a better chance of the stencil bleeding!


I used the little card my stencil was on as a general guide for how far apart to space the hearts, but for the most part I eyed it and just tried to keep them generally lined up.


Step 4: Make your sister carefully put the jeans on well before they're dry so you can take pictures for your blog because a work pal requested it (Hi Jackie!). Promise the sister you won't have her face in the pictures.


Step 5: Wish your sister wore the same size shoes as you, since your booties do look extra cute on her.


You can see there's a couple of spots where I got paint and it didn't belong, but that doesn't bother me a whole lot. Truth be told, I haven't stenciled the back of the pant legs yet, but am planning to do so tomorrow because I'm reeeeeeally excited to wear these over the weekend! If I'm feeling bold, I may even take a picture of myself in them instead of making my much skinnier little sister do it for me ;).

Happy Friday, friends! I'll be back Monday with another DIY, and also have the full porch tour scheduled for a post next week!

Thursday, May 9, 2013

DIY: Quick Canvas Art

I promised a DIY-a-day for the next several days, and this first one is super simple and barely took a half hour to complete. That's my kind of project!

I've had this wall decal from Urban Outfitters pinned for awhile now, and love the quote, but I'm not a fan of decals and knew I could swipe the quote for something more fitting instead.


I grabbed a small canvas I already had laying around, a foam brush, some letter stickers and a little bottle of neon pink paint that I picked up at Michael's on a recent trip and got to work.


After laying the stickers out on the canvas and making sure they were good and pressed down, I went over the entire thing with a couple quick coats of the neon pink paint.


Once the paint dried some, I peeled the stickers off... and then learned that my stickers were a little too old and not as sticky as I needed them to be, so the paint bled a bit. I touched the entire thing up with a tiny brush and some white paint, and while it was a pain, it helped it all look a little more polished in the end. 

I didn't want to get a hammer out, so I just stuck a couple thumbtacks in the wall on the porch and hung the canvas. The horseshoe is from an antique shop we went to on a weekend away in Wisconsin a few years ago, and it was looking a little lonely so I'm loving the bright pop of color underneath it from the canvas!

Wednesday, May 8, 2013

Spring Pinterest Challenge: Pallet Couch

Hello Pinterest Challenge friends! I am so glad you're here to see my latest project! I hope you'll stick around for awhile - I'm planning to post a DIY-a-day for the next several days in honor of all of YOU here checking out my little corner of the blogosphere and would love for you to follow along. First up though, of course... the challenge!


When my faves over at Young House Love and Bower Power posted the latest challenge last week I screeched, and then immediately IM'd the hubs to let him know that it was time to do something I'd been talking about for months. No more stalling. No more excuses. I was going to build a pallet couch for the front porch, and the poor guy was going to be stuck helping me whether he liked it or not. Thankfully, he was (sort of) on board, and I managed to sucker my crafty mom into helping me as well. High fives for teamwork!

There is an endless supply of inspiration on Pinterest for pallet couches, but my very favorite - and first one I ever saw - is from a blogger I truly admire, Ashley Ann of Under the Sycamore.


I wrote a few weeks ago about how our porch has been a revolving mess of craigslist and garage sale furniture since we bought our house. As the weather has warmed up I've become obsessed with the idea of having game nights with drinks and snacks out there, so figuring out a way to affordably furnish the space for real became a major priority for me. I knew it would be way more affordable, way more "us" and way more fun to tackle a DIY couch instead of just buying something... and thanks to lots of help and this latest Pinterest Challenge giving me a bit of a self-imposed deadline, that's exactly what happened!

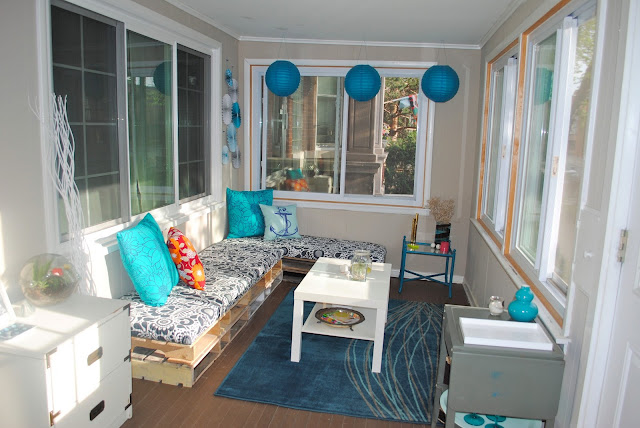
I'll post a full "tour" of the porch next week because I am genuinely in love with it, but for now let's just focus on the couch shall we?!? I realized that most of the couches on Pinterest don't offer much of a real tutorial, so I've made an attempt at that here. Enjoy!

Step 1: Get your hands on some pallets. I posted a facebook status asking if anyone knew where I could get some and got super lucky that my pal Tim's cousin works somewhere sorta local with pallets and was willing to pass a few my way for a mere $2 each. Thanks John! If you don't have a John in your life, check craigslist for pallets.

Step 2: Cut the pallets in half. This is only necessary if your space is skinny like ours - many of the inspiration images I've seen use the pallets at their full depth, but we don't have that kind of room.


The pallets we had were 40"x48". Dan cut 3 in half to 40"x24", and cut one down even further to 20"x24" to make a little corner section. Here's a layout for reference -


Step 3: Stack the pallets in your space. Here's half of ours on the porch, which we did to get an idea of how it was all going to look. Don't mind the awful rug, it's on it's way to the dumpster as we speak.


Step 4: Gather supplies for your cushions. We decided on 2 big bench-type cushions instead of several smaller ones. Here's what you need:
- Ridiculously expensive foam. Seriously, why on earth does the stuff cost so much?!? The good news here was that big giant slabs of foam just happen to be 24" wide, which was exactly the size I needed. The slabs were also 72" long, which meant I only needed two, and thanks to 40% off Hancock Fabrics coupons weren't too pricey. 
- A roll of batting. This was my mom's suggestion, and I'm glad I listened as it helped keep the fabric all nice and smooth.
- Fabric. I found a great pattern I loved at Ikea for $6.99 a yard. 5 yards did the trick!
- Plywood cut to size. Dan bought one sheet and had Home Depot cut it down for us, which kept the whole thing simple!
- Staple gun. And a hammer for when you inevitably don't get the staples in all the way the first time.

Step 5: Build your cushions!
First, we used a little spray mount to attach the foam to the plywood. Then flipped the whole thing over, laid the batting out on the table, wrapped it around to the back and put a few quick staples in to secure it all together.


Next up was the fabric, which we trimmed to size and laid out nice and smooth over the batting to make sure we liked how the pattern lined up.


Then we flipped it all over again, folded under the edges and stapled the heck out of it. We did the long sides first, then the short sides, and finally the corners.

Here's Dan and my mom demonstrating some awesome teamwork. I'm sure they'll both be thrilled to see themselves on the blog. Love you guys! (PS - check out my mom's ombre sweatshirt. STY-L-IN!)


Step 6: Put the cushions on top of your pallets and squeal at your awesome new couch! Drumroll please...


I mean for real... I'm in love.


Full shot of the couch and sneak peek at more of the porch:


Full disclosure: the kid sister and I are already planning sleepovers out on the porch this summer. I get the longer side of the couch since I've still got about a half inch on her height-wise ;).


Isn't it just great?


All in, this project cost under $150 (the foam alone was nearly $100 of that). While this is admittedly a bit more than I would have liked to spend, it's definitely much less than a sectional couch the same size would have run us, so I'll take it!

If you've made it this far, thanks for sticking with me! I'm linked up with lots of other crafty people over on Young House Love and Bower Power, and also on both guest host blogs - Sparkle Meets Pop and Red Bird Blue, so be sure to click over and check out a ton of other fun challenge projects. And please do stop back here for more DIY's in the next few days!

Wednesday, April 17, 2013

My Best Friend's Wedding... Invitations

Eek! We finished up Bridget and Aris' wedding invitations last week and now that we know they've gone through the mail to guests I'm extra excited to share them here!


I've mentioned before how calm and collected Bridget has been as a bride, and these invitations were no exception. I put together ONE design on a whim when I was home sick with the flu, and she totally loved it and said "let's go with it" the next day. Easiest design client EVER. And, when there were a couple of setbacks during printing I was probably more of a bridezilla than Bridget ever was through the whole process, so props to her for keeping the cool all along! 


I wanted the invitations to reflect how I feel about Bridget and Aris and how I see them as a couple - they're fun and laid-back, but also really kind of stylish and put together and classy. So I did things like use a super pretty font to say quirky things like "Best Day Ever" on the main card and "Gorgeous bride, handsome groom, and lots of delicious beer" on the RSVP. Overall, I had a ton of fun with this project.

The "something old, something new, something borrowed, something brewed" on the hang tag was Bridget's idea, and I think we both agree that these punched-out pieces were the perfect finishing touch to the whole suite.


Since guests only get one invitation in the mail nobody will really know that we used lots of different patterned paper for the thick belly bands, but that is hands down my favorite part of the whole invitation. We were originally going to use solid ash gray sheets for the belly bands to match the envelopes and I am SO glad we came up with the idea to use scrapbook sheets in varying patterns instead. It keeps the overall feel of the invitations bright and fun. The patterns will carry through in Bridget's reception decorations in several ways, and I'm brainstorming how to incorporate them into the programs I'm designing as well. 


Without wanting to share all of the details of the big day on the internet for everyone to see, here's one shot of the whole suite. The four small cards and a matching RSVP envelope were all stacked behind the main piece and held together with the belly band.


I couldn't be happier with how the invitations turned out, and I hope Bridget, Aris and their families are as excited about them as I am!

Monday, April 8, 2013

Giant Jenga

So, this happened this weekend. (And I of course only had my iPhone out to document it.)


That's right. The hubby (and Jamie) made a giant Jenga set, which we enjoyed in the garage with friends, sliders with brie and bacon, and drinks in mason jars. Best way ever to spend a Spring Saturday evening? I think so.

I don't have a real tutorial for this because it was insanely simple, but if you're looking to make your own set that's about the size of a 3rd grader... here's a quick rundown on how to tackle it:

- Go to Home Depot and buy six 2x4x8' boards
- Ask the handy guys at Home Depot with the giant wall-saw to cut the boards to 10.5 inch pieces for you. They will do this for FREE.
- Take your 54 cut pieces of wood home, and give them a quick sanding with a block (or skip this step for now if you're like us and you're super excited to just play the game)
- Stack the pieces up just like a Jenga game on a flat surface - 3 to a row, alternating rows horizontally and vertically.
- Grab some friends and play the coolest game of Jenga ever.

Note: WATCH YOUR TOES. Mine are insanely fragile and break like sticks, so playing this game was a little nerve-racking for me knowing that the tower would eventually fall. Thankfully, nobody was harmed during the making of or playing of this game, and it was an awesomely fun time.

How was your weekend?

Tuesday, February 26, 2013

Winter Pinterest Challenge: Sunburst Mirror


Well seeing as my blog traffic jumped from a measly average of 6 page views a day to, um, something like 2,000 the day that I participated in the last Young House Love link-up, I figured I'd better join in on the next one. Just kidding! When Sherry posted the latest link up last week and I saw that it was another Pinterest challenge, I jumped on the bandwagon for a few other reasons, too.

(1) I luuuurve me some Pinterest. A friend just told me today that she spent an hour stalking my boards, so I clearly have great taste in pinning things. (Unfortunately for me, Pinterest does not always translate to great taste in real life. Womp womp).

(2) We're currently tackling our latest upgrade, which I've titled "Project Grown-up Bedroom", and I was over the boring rectangular mirror in our room that I bought at Ikea years ago and had Dan nail to the wall as a "good enough for the time being" solution.

(3) Truth be told, I bought a round mirror, a bunch of wood shims and a couple little tester pots of paint to DIY a sunburst mirror something like... a year ago... so I figured it was about time I actually DO something with all of it. A Young House Love & Bower Power link up challenge was just the push I needed!

So, I sweet talked the hubs into helping me because I knew in the end that would turn out better than if I did it myself, and we made ourselves a really really awesome (if I do say so myself) sunburst mirror last weekend!

There's endless amounts of inspiration pictures on Pinterest for sunburst mirrors, since the style was crazy popular a couple years ago and in my opinion, pretty classic.


First up - supplies needed:
- A round mirror - I bought the Kolja Mirror at Ikea for $15 that's 22" in diameter (so, sort of gigantic)
- Several packs of wood shims - these things are super cheap at any hardware store. We used about 70 total.
- A big round wooden disc that's not quite as large as your mirror. Dan found one 18" in diameter at Home Depot for $6, which I'm pretty sure was pure luck because he said it was the only one there and the guy working in the department didn't even know where it came from. I'll take it.
- A tester pot of paint - I used an off-white base and then also added a coat of a silvery Martha Stewart metallic glaze. Looking back on it, I totally wish I'd used gold since it's my latest obsession and there's a LOT of gray tones in our room right now, but I can always change it up in the future if it bugs me.
- Small foam brushes for the paint
- A saw to trim the shims if you want a layered or staggered look in the end
- Liquid Nails or other super strong glue
- Strong picture hanging hook and a nail

As I mentioned, I had the idea to make the mirror with wood shims a long time ago, but I'd never really bothered to figure out the logistics of how it would actually all come together and hang on a wall. In the end - a tutorial from A Beautiful Mess was the biggest help, as we got the idea to use a big round disk from there. Thanks ladies!

Step 1: We glued the round disk to the back of the mirror and stacked a bunch of heavy books on it overnight to dry.


Step 2: We painted about 75 wood shims with 2 quick coats of paint and 1 extra thin coat of the glaze. I didn't bother to paint the ends because I knew they'd be chopped off.


Step 3: Once all the shims dried overnight, Dan trimmed them to appropriate lengths. We just kind of eyeballed where we thought would look good, and went from there. And I didn't take pictures of this step because I'm a baby and the saw in the basement was really loud.

Step 4: After everything was cut down to 2 lengths, we glued the shorter layer of shims to the back of the mirror, using the wood disk as a guide to keep them all lined up and evenly spaced. Look how excited Dan was to help with this!


I also wore cute socks for this step, which I thought was crucial. 


Step 5: After letting the first layer of shims dry overnight just to be safe, we added on the second (slightly longer) layer to fill in all of the gaps with lots more glue.


Step 6: Dan added the picture hanging hook to the back of the wood disk with a hammer and small nails. Had I thought about this ahead of time, I definitely would have had him do this step BEFORE we glued the disk to the mirror, because having him take a hammer to it after there was a GLASS mirror attached gave me some serious anxiety. Lesson learned.

Step 7: Hang the mirror on the wall. Here's where this got a little intense. We did this entire project with the mirror face down on the floor of the office, and while the shims were definitely attached securely, they weren't strong enough that you could grab them and lift the mirror off the floor. Oops. Dan carefully picked the whole thing up by the round disk with just his fingertips, got it off the floor, and then carried it from the bottom (like a tray) into the bedroom. To get it on the wall he had to grip the mirror from the front with basically just his fingernails and hold it totally steady to line the hook up with the nail on the wall. Rest assured that I was in a full panic during all of this, but as usual, he got it in one shot and it was perfect.

The one pretty cool part about having the mirror face down the entire time we were making it is that I had NO idea what the final project looked like until it was on the wall. Thankfully, I am absolutely in LOVE with how it turned out! I laughed, I squealed and I Instagramed a picture immediately. Isn't it pretty?!?


Oh heeeeeeeey. Here's me pretending I know how to use my camera.


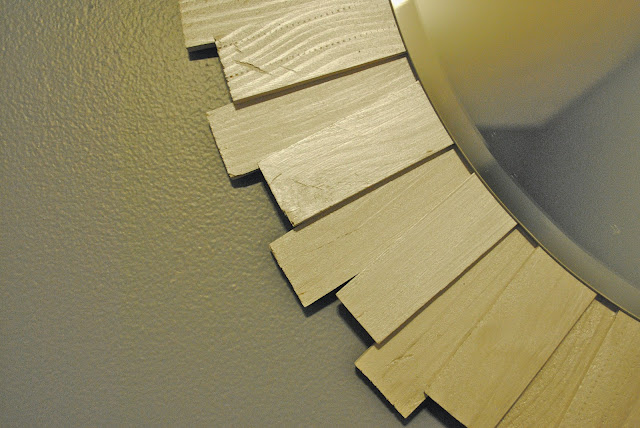
And a necessary close-up shot.


Thanks to my superb color-correcting skills, you can see several shots of our freshly painted walls here but have no idea what color they actually are since they look different in every picture. Oh well. This is about the mirror, and it's gorgeous. (Really though, the first full shot of the mirror above is probably the closest to the wall color. Yay!)

So that's our super fun sunburst mirror, which I am totally smitten with. It's such a big statement pice and really just makes the bedroom for me. And, it cost us less than $30 all-in, which is really exciting since I've seen similar styles in stores for HUNDREDS of dollars!
I'm pumped to see what other Young House Love and Bower Power readers came up with for the challenge. I'm linked up on both sites, as well as their co-hosts for this round - Decor & The Dog and The Remodeled Life, so head on over to check them all out!