

Well seeing as my blog traffic jumped from a measly average of 6 page views a day to, um, something like 2,000 the day that I participated in the last Young House Love link-up, I figured I'd better join in on the next one. Just kidding! When Sherry posted the latest link up last week and I saw that it was another Pinterest challenge, I jumped on the bandwagon for a few other reasons, too.
(1) I luuuurve me some Pinterest. A friend just told me today that she spent an hour stalking my boards, so I clearly have great taste in pinning things. (Unfortunately for me, Pinterest does not always translate to great taste in real life. Womp womp).
(2) We're currently tackling our latest upgrade, which I've titled "Project Grown-up Bedroom", and I was over the boring rectangular mirror in our room that I bought at Ikea years ago and had Dan nail to the wall as a "good enough for the time being" solution.
(3) Truth be told, I bought a round mirror, a bunch of wood shims and a couple little tester pots of paint to DIY a sunburst mirror something like... a year ago... so I figured it was about time I actually DO something with all of it. A Young House Love & Bower Power link up challenge was just the push I needed!
So, I sweet talked the hubs into helping me because I knew in the end that would turn out better than if I did it myself, and we made ourselves a really really awesome (if I do say so myself) sunburst mirror last weekend!
There's endless amounts of inspiration pictures on Pinterest for sunburst mirrors, since the style was crazy popular a couple years ago and in my opinion, pretty classic.


- A round mirror - I bought the Kolja Mirror at Ikea for $15 that's 22" in diameter (so, sort of gigantic)
- Several packs of wood shims - these things are super cheap at any hardware store. We used about 70 total.
- A big round wooden disc that's not quite as large as your mirror. Dan found one 18" in diameter at Home Depot for $6, which I'm pretty sure was pure luck because he said it was the only one there and the guy working in the department didn't even know where it came from. I'll take it.
- A tester pot of paint - I used an off-white base and then also added a coat of a silvery Martha Stewart metallic glaze. Looking back on it, I totally wish I'd used gold since it's my latest obsession and there's a LOT of gray tones in our room right now, but I can always change it up in the future if it bugs me.
- Small foam brushes for the paint
- A saw to trim the shims if you want a layered or staggered look in the end
- Liquid Nails or other super strong glue
- Strong picture hanging hook and a nail
As I mentioned, I had the idea to make the mirror with wood shims a long time ago, but I'd never really bothered to figure out the logistics of how it would actually all come together and hang on a wall. In the end - a tutorial from A Beautiful Mess was the biggest help, as we got the idea to use a big round disk from there. Thanks ladies!
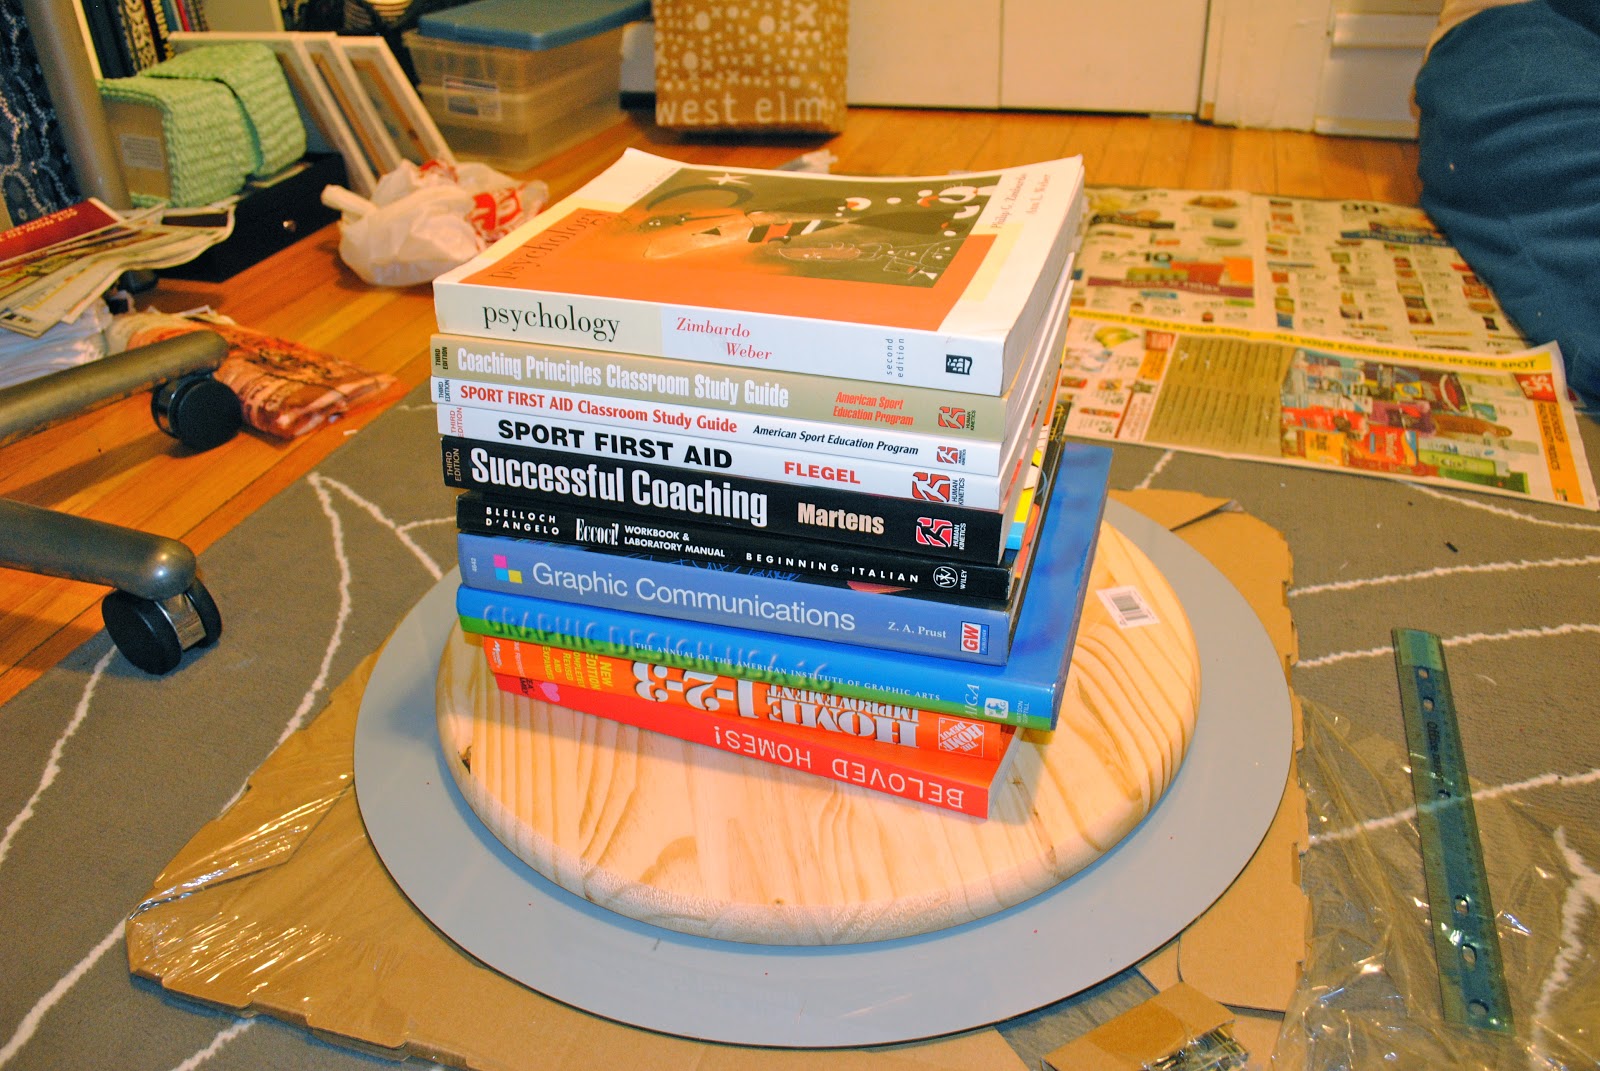
Step 1: We glued the round disk to the back of the mirror and stacked a bunch of heavy books on it overnight to dry.

Step 2: We painted about 75 wood shims with 2 quick coats of paint and 1 extra thin coat of the glaze. I didn't bother to paint the ends because I knew they'd be chopped off.

Step 3: Once all the shims dried overnight, Dan trimmed them to appropriate lengths. We just kind of eyeballed where we thought would look good, and went from there. And I didn't take pictures of this step because I'm a baby and the saw in the basement was really loud.
Step 4: After everything was cut down to 2 lengths, we glued the shorter layer of shims to the back of the mirror, using the wood disk as a guide to keep them all lined up and evenly spaced. Look how excited Dan was to help with this!

I also wore cute socks for this step, which I thought was crucial.

Step 5: After letting the first layer of shims dry overnight just to be safe, we added on the second (slightly longer) layer to fill in all of the gaps with lots more glue.

Step 6: Dan added the picture hanging hook to the back of the wood disk with a hammer and small nails. Had I thought about this ahead of time, I definitely would have had him do this step BEFORE we glued the disk to the mirror, because having him take a hammer to it after there was a GLASS mirror attached gave me some serious anxiety. Lesson learned.
Step 7: Hang the mirror on the wall. Here's where this got a little intense. We did this entire project with the mirror face down on the floor of the office, and while the shims were definitely attached securely, they weren't strong enough that you could grab them and lift the mirror off the floor. Oops. Dan carefully picked the whole thing up by the round disk with just his fingertips, got it off the floor, and then carried it from the bottom (like a tray) into the bedroom. To get it on the wall he had to grip the mirror from the front with basically just his fingernails and hold it totally steady to line the hook up with the nail on the wall. Rest assured that I was in a full panic during all of this, but as usual, he got it in one shot and it was perfect.
The one pretty cool part about having the mirror face down the entire time we were making it is that I had NO idea what the final project looked like until it was on the wall. Thankfully, I am absolutely in LOVE with how it turned out! I laughed, I squealed and I Instagramed a picture immediately. Isn't it pretty?!?

Oh heeeeeeeey. Here's me pretending I know how to use my camera.

And a necessary close-up shot.

Thanks to my superb color-correcting skills, you can see several shots of our freshly painted walls here but have no idea what color they actually are since they look different in every picture. Oh well. This is about the mirror, and it's gorgeous. (Really though, the first full shot of the mirror above is probably the closest to the wall color. Yay!)
So that's our super fun sunburst mirror, which I am totally smitten with. It's such a big statement pice and really just makes the bedroom for me. And, it cost us less than $30 all-in, which is really exciting since I've seen similar styles in stores for HUNDREDS of dollars!
I'm pumped to see what other Young House Love and Bower Power readers came up with for the challenge. I'm linked up on both sites, as well as their co-hosts for this round - Decor & The Dog and The Remodeled Life, so head on over to check them all out!
Your mirror turned out beautifully! Love it!! Makes me want to make one :)
ReplyDeletewow I love how yours is a little smaller but the mirror is bigger - that just seems more useul to me. I like how its very modern sunburst-y but useful too!
ReplyDeleteLove the mirror!
ReplyDeleteI also have had the supplies for a sunburst mirror project for over a year... guess we are all guilty of procrastinating... or more accurately jumping to other projects!
Great job! This same project is on my To Do list, I even have the shims purchased. Thanks for the tip about attaching the hook before the mirror, I'm sure I would have done the same thing.
ReplyDeleteI love it! :) You did a great job -- and getting it done for $30 is awesome! :)
ReplyDeleteI also participated in the challenge and built an herb planter box! :)
Thanks for sharing!
Shannon
Fabulously Vintage
This looks wonderful. I have been contemplating doing the same for above my fireplace. Your tutorial and design are just perfect for me. Thanks for sharing. Hopefully, I'll get this done in less than a year. Thanks for giving me push to get it done.
ReplyDeleteLove love love it! I have also been wanting to diy myself a sunburst mirror ... just might have to "borrow" your idea! I'm visiting from YHL and am your newest follower :)
ReplyDeleteI'll never tire of beautiful sunburst mirrors! Yours turned out beautifully!!
ReplyDelete~Fellow My Pinterest Boards Are Classier Than I Am
This is ah-mazing! I'm so impressed!
ReplyDeleteThis is so awesome! It turned out absolutely beautiful and who doesn't love a good sunburst mirror?? Thanks for linking up!
ReplyDeleteLOVE the way you did your sunburst mirror! I did one too.
ReplyDeleteI did a sunburst mirror too! Love how yours turned out. Looks Great!
ReplyDeleteLOVE how this turned out!
ReplyDeleteSarah
Seriously awesome job. I'm totally inspired.
ReplyDeleteOh well done. You guys did an amazing job. Sounds like you are a great team - hubs doing the actual work and you doing the emotional freaking out (very necessary contribution). I love circular mirrors and yours is a classic.
ReplyDeleteIt turned out great!!
ReplyDeleteI love it!! Can't wait to see it in person.
ReplyDeleteLove it! I like your method too... I've been putting off making one for a really long time for over our bed but I think I could handle it the way you did it! I did a project for the pinterest challenge too if you'd like to come over and visit my blog :)
ReplyDelete