1 Cakes & Louie

Tuesday, May 14, 2013

I'm a Blog Trends Featured Blogger!

In the last couple of months, I've worked really hard to make Cakes & Louie more of a priority for myself, and let me tell you - I am loving it! I'm (virtually) meeting new friends, gaining some incredible opportunities, networking and most importantly - writing more - which was the whole point of this blog to begin with! I have always loved writing, and having this outlet has been such an awesome experience for me, so thank YOU, whoever you are, for stopping by daily or weekly or randomly or whatever to read my little blog. I am so excited to see where this site can take me, and genuinely hope you'll continue to read along.


And speaking of things I'm excited about, I am thrilled to announce that I am the current Featured Blogger over at Blog Trends! I posted a link to our pallet couch late last week, asked my friends and family on Facebook to vote for me, and thanks to all the super cool people in my life, I got the most votes within a few days! Next thing I knew, I was spending my Sunday evening filling out a questionnaire about my blog and begging the hubs to get up early this morning to take a new photo outside for me to submit with my write-up. I'm not 100% crazy about the picture, but I look giddy happy (I was) and the morning sun made my hair look all shiny so that's fun, right? ;)


My writeup went up on the Blog Trends site this afternoon, and this evening I participated in the weekly #BlogTrends Twitter chat where I connected with a bunch of bloggers and snagged a TON of great tips from others on balancing your blog with everything else in life. Needless to say, the Blog Trends community is incredible, and I am so looking forward to getting more involved with it moving forward!

Monday, May 13, 2013

DIY: Terrarium

I grabbed a terrarium on clearance at West Elm last year with hopes that it would be a foolproof way for me and my lack of a green thumb to have some plant life around the house. Thanks to a sale on succulents at Home Depot a couple weeks ago and a little patience, I am officially testing out the theory that cacti are nearly impossible to kill. We'll see. They are super cute though, aren't they?


I started with a layer of pea gravel at the bottom of the terrarium, and layered regular old top soil over that. Then I just arranged the little succulents in there however I liked and made sure they were "secure" with a little more soil. This was tough given that I apparently have fat hands and could barely get them through the little hole at the front of my terrarium, but I managed. I think I may need to redo the whole thing at some point since the aloe plant is already squished in there and has no room to grow, but we'll see how bold I get. I'm not even entirely sure this qualifies as a DIY exactly, but I'm gonna go with it. If you would like a more defined tutorial, check out this one from Making it Lovely! The fine folks over at West Elm themselves suggested it to me via Twitter (does anyone else freak out when brands tweet at them or is it just me?), and since I've been a fan of Making it Lovely's for years I knew it would be good.


Here's my final product sitting pretty on the front porch!


Happy Monday all! Hope you showered your mom with lots of love yesterday!

Friday, May 10, 2013

DIY: Heart Print Jeans

Well I'm getting all kinds of acquainted with little foam paint brushes and fun paint colors this week aren't I? Tonight, with the help of the kid sister, I decided to tackle something I've been wanting to try for quite some time - DIY "printed" jeans. And, thanks to my obsession with buying the $10.50 jeans at Forever 21 in bulk, I had 3 pairs of the exact same pants which meant one of them clearly needed a makeover. This project was so easy and fun that the other two pairs may be getting changed up in the near future as well.

Fair warning - this is one of those posts where you're just going to have to deal with every single picture having different coloring. I swear I will learn to use my camera properly someday.

Step 1: Grab yourself a pair of $10.50 Forever 21 jeans, lay them out on a flat surface and shove some thin cardboard in the legs.


Step 2: Fold a piece of heavy paper in half and cut out a cute little heart. Or cut out 4 cute little hearts before you get one you're happy with like I did.

Step 3: Hold the stencil down good and flat on your jeans and use a little round sponge brush to dab on some paint. I went with gold since I thought white was boring but gold was still acceptable (well, as acceptable as gold hearts on jeans can be for an almost-31-year-old). Don't use too much paint or there's a better chance of the stencil bleeding!


I used the little card my stencil was on as a general guide for how far apart to space the hearts, but for the most part I eyed it and just tried to keep them generally lined up.


Step 4: Make your sister carefully put the jeans on well before they're dry so you can take pictures for your blog because a work pal requested it (Hi Jackie!). Promise the sister you won't have her face in the pictures.


Step 5: Wish your sister wore the same size shoes as you, since your booties do look extra cute on her.


You can see there's a couple of spots where I got paint and it didn't belong, but that doesn't bother me a whole lot. Truth be told, I haven't stenciled the back of the pant legs yet, but am planning to do so tomorrow because I'm reeeeeeally excited to wear these over the weekend! If I'm feeling bold, I may even take a picture of myself in them instead of making my much skinnier little sister do it for me ;).

Happy Friday, friends! I'll be back Monday with another DIY, and also have the full porch tour scheduled for a post next week!

Thursday, May 9, 2013

DIY: Quick Canvas Art

I promised a DIY-a-day for the next several days, and this first one is super simple and barely took a half hour to complete. That's my kind of project!

I've had this wall decal from Urban Outfitters pinned for awhile now, and love the quote, but I'm not a fan of decals and knew I could swipe the quote for something more fitting instead.


I grabbed a small canvas I already had laying around, a foam brush, some letter stickers and a little bottle of neon pink paint that I picked up at Michael's on a recent trip and got to work.


After laying the stickers out on the canvas and making sure they were good and pressed down, I went over the entire thing with a couple quick coats of the neon pink paint.


Once the paint dried some, I peeled the stickers off... and then learned that my stickers were a little too old and not as sticky as I needed them to be, so the paint bled a bit. I touched the entire thing up with a tiny brush and some white paint, and while it was a pain, it helped it all look a little more polished in the end. 

I didn't want to get a hammer out, so I just stuck a couple thumbtacks in the wall on the porch and hung the canvas. The horseshoe is from an antique shop we went to on a weekend away in Wisconsin a few years ago, and it was looking a little lonely so I'm loving the bright pop of color underneath it from the canvas!

Wednesday, May 8, 2013

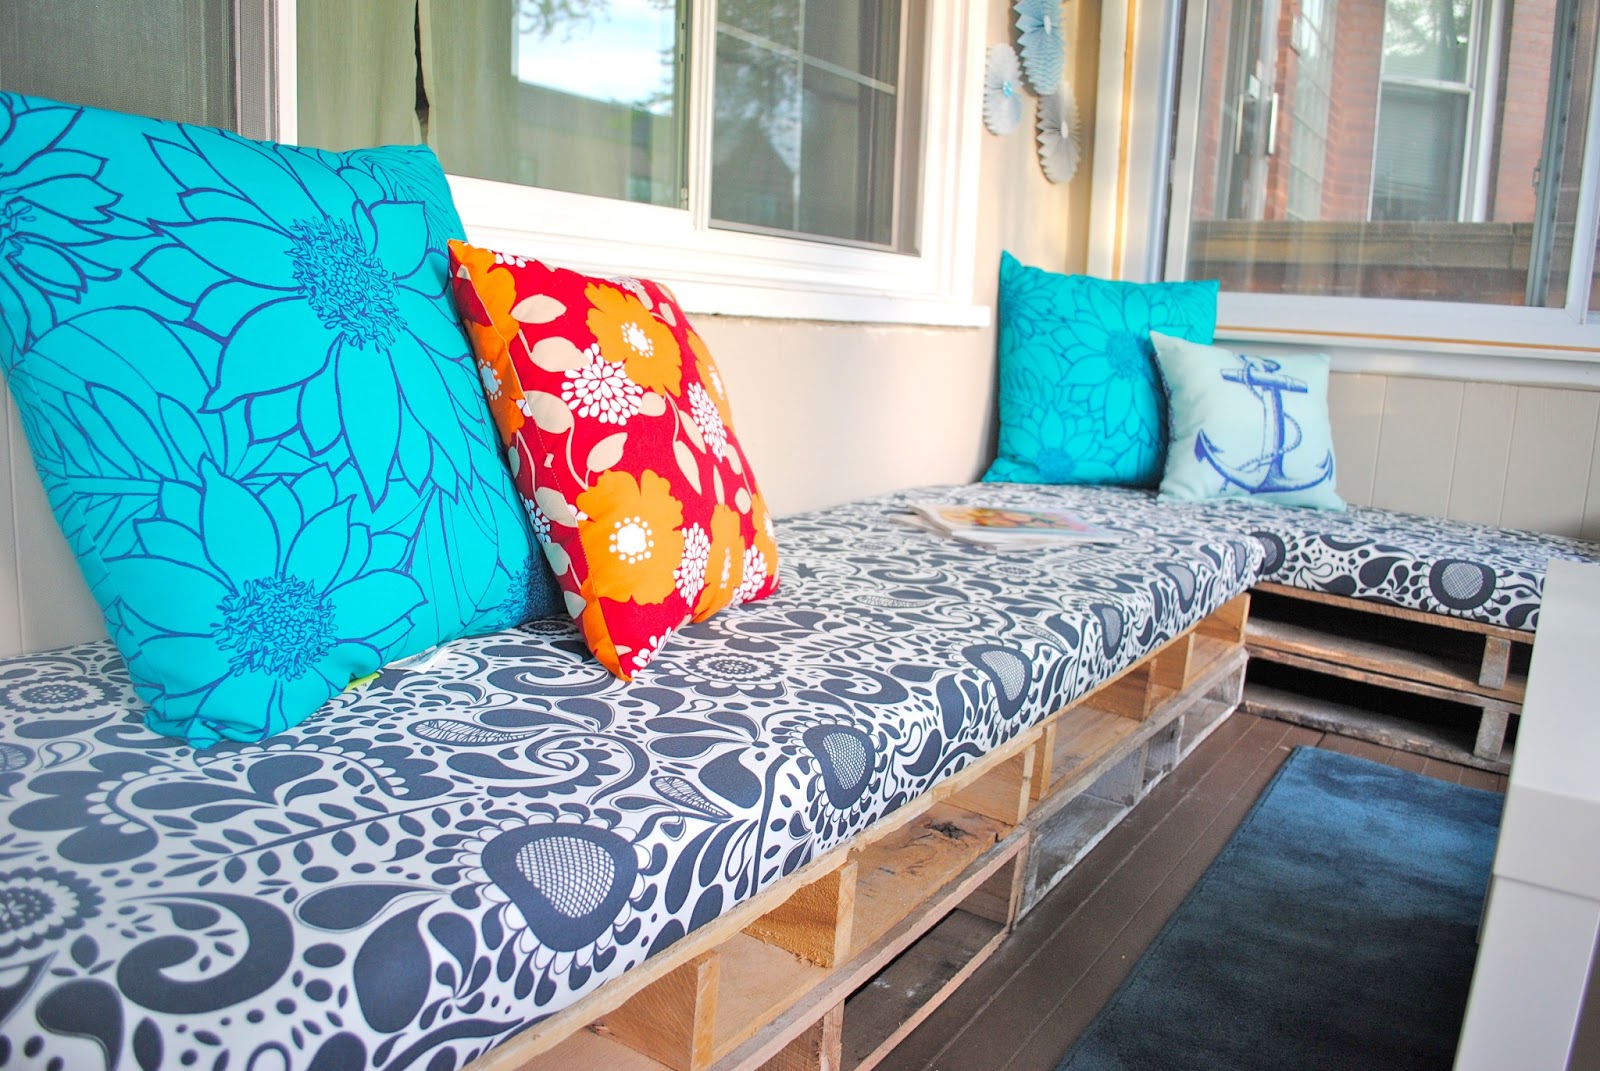
Spring Pinterest Challenge: Pallet Couch

Hello Pinterest Challenge friends! I am so glad you're here to see my latest project! I hope you'll stick around for awhile - I'm planning to post a DIY-a-day for the next several days in honor of all of YOU here checking out my little corner of the blogosphere and would love for you to follow along. First up though, of course... the challenge!


When my faves over at Young House Love and Bower Power posted the latest challenge last week I screeched, and then immediately IM'd the hubs to let him know that it was time to do something I'd been talking about for months. No more stalling. No more excuses. I was going to build a pallet couch for the front porch, and the poor guy was going to be stuck helping me whether he liked it or not. Thankfully, he was (sort of) on board, and I managed to sucker my crafty mom into helping me as well. High fives for teamwork!

There is an endless supply of inspiration on Pinterest for pallet couches, but my very favorite - and first one I ever saw - is from a blogger I truly admire, Ashley Ann of Under the Sycamore.


I wrote a few weeks ago about how our porch has been a revolving mess of craigslist and garage sale furniture since we bought our house. As the weather has warmed up I've become obsessed with the idea of having game nights with drinks and snacks out there, so figuring out a way to affordably furnish the space for real became a major priority for me. I knew it would be way more affordable, way more "us" and way more fun to tackle a DIY couch instead of just buying something... and thanks to lots of help and this latest Pinterest Challenge giving me a bit of a self-imposed deadline, that's exactly what happened!

I'll post a full "tour" of the porch next week because I am genuinely in love with it, but for now let's just focus on the couch shall we?!? I realized that most of the couches on Pinterest don't offer much of a real tutorial, so I've made an attempt at that here. Enjoy!

Step 1: Get your hands on some pallets. I posted a facebook status asking if anyone knew where I could get some and got super lucky that my pal Tim's cousin works somewhere sorta local with pallets and was willing to pass a few my way for a mere $2 each. Thanks John! If you don't have a John in your life, check craigslist for pallets.

Step 2: Cut the pallets in half. This is only necessary if your space is skinny like ours - many of the inspiration images I've seen use the pallets at their full depth, but we don't have that kind of room.


The pallets we had were 40"x48". Dan cut 3 in half to 40"x24", and cut one down even further to 20"x24" to make a little corner section. Here's a layout for reference -


Step 3: Stack the pallets in your space. Here's half of ours on the porch, which we did to get an idea of how it was all going to look. Don't mind the awful rug, it's on it's way to the dumpster as we speak.


Step 4: Gather supplies for your cushions. We decided on 2 big bench-type cushions instead of several smaller ones. Here's what you need:
- Ridiculously expensive foam. Seriously, why on earth does the stuff cost so much?!? The good news here was that big giant slabs of foam just happen to be 24" wide, which was exactly the size I needed. The slabs were also 72" long, which meant I only needed two, and thanks to 40% off Hancock Fabrics coupons weren't too pricey. 
- A roll of batting. This was my mom's suggestion, and I'm glad I listened as it helped keep the fabric all nice and smooth.
- Fabric. I found a great pattern I loved at Ikea for $6.99 a yard. 5 yards did the trick!
- Plywood cut to size. Dan bought one sheet and had Home Depot cut it down for us, which kept the whole thing simple!
- Staple gun. And a hammer for when you inevitably don't get the staples in all the way the first time.

Step 5: Build your cushions!
First, we used a little spray mount to attach the foam to the plywood. Then flipped the whole thing over, laid the batting out on the table, wrapped it around to the back and put a few quick staples in to secure it all together.


Next up was the fabric, which we trimmed to size and laid out nice and smooth over the batting to make sure we liked how the pattern lined up.


Then we flipped it all over again, folded under the edges and stapled the heck out of it. We did the long sides first, then the short sides, and finally the corners.

Here's Dan and my mom demonstrating some awesome teamwork. I'm sure they'll both be thrilled to see themselves on the blog. Love you guys! (PS - check out my mom's ombre sweatshirt. STY-L-IN!)


Step 6: Put the cushions on top of your pallets and squeal at your awesome new couch! Drumroll please...


I mean for real... I'm in love.


Full shot of the couch and sneak peek at more of the porch:


Full disclosure: the kid sister and I are already planning sleepovers out on the porch this summer. I get the longer side of the couch since I've still got about a half inch on her height-wise ;).


Isn't it just great?


All in, this project cost under $150 (the foam alone was nearly $100 of that). While this is admittedly a bit more than I would have liked to spend, it's definitely much less than a sectional couch the same size would have run us, so I'll take it!

If you've made it this far, thanks for sticking with me! I'm linked up with lots of other crafty people over on Young House Love and Bower Power, and also on both guest host blogs - Sparkle Meets Pop and Red Bird Blue, so be sure to click over and check out a ton of other fun challenge projects. And please do stop back here for more DIY's in the next few days!

Tuesday, May 7, 2013

The Bigger Picture


I was sitting in the hospital waiting room yesterday morning - waiting for Dan's surgery to start, waiting for my father in law to get there to keep me company, and waiting for my brother to call and let me know if I'm getting a new niece or nephew in September. I was also stewing about the whole idea of not going to Mexico in two weeks. Overall, I was kind of an anxious mess. Then a surgeon came out to chat with the family next to me and I could tell they weren't getting great news. A few minutes later one of the women with the family walked over next to me to take a phone call and told the person on the other end of the line that whoever it was in surgery that morning had officially been diagnosed with lymphoma.

When I heard that other family talking, I instantly felt guilty and much better all at once. Dan was in surgery to get his tonsils out and have his insanely long uvula shortened. The procedure was barely an hour and a half and he was done, and while he'll have a rough couple of weeks with a very sore throat, he is healthy and well. Don't get me wrong - there's a piece of me that's good and livid about Mexico not happening, but there's a much bigger piece of me that is grateful that a change in vacation plans is the biggest of our worries right now.

image from here

Monday, May 6, 2013

Setbacks

The hubby is being wheeled into the OR for a fairly minor surgery as I write this from a hospital lounge. The surgeon - who I trust immensely - pretty much just told me there is no way he can get on a plane to go to Mexico in two weeks. So, please forgive the lack of a fun post today... I had plans to write one since I've got a pretty boring several  hours ahead of me, but the chance of our trip being cancelled has me good and bummed.

Does anyone else have AWFUL luck with traveling? Or is it just me?

Friday, May 3, 2013

Lay it all out there: Things that make me uncomfortable


I’ve decided to sort of half participate in Jenni from Storyof my Life’s “Blog Everyday in May” challenge… get ready for more rambling and randomness from me than you could probably ever want!


The reason I say I’m half participating is because while I do plan to try and blog almost everyday in May, I already have some things that are going to make that challenging – like a vacation – so I don’t want to say I’m 100% going to succeed. And, Jenni was extra awesome and came up with topics for all of us bloggers to write about every day if we were experiencing a bit of writer’s block, but I don’t plan on using those prompts every single day since I already have some other posts planned – like my DIY pallet couch for next week!

But bottom line, I was excited to stumble on Jenni’s blog, add her super cute button to my sidebar, and linkup with a ton of other bloggers on the days that I do follow the prompts. Today’s “things that make me uncomfortable” topic is insanely simple for me considering I am generally a very squrmish, prude and awkward person :). So, here ya go, a list of 4 things that make me incredibly uncomfortable. There are obviously a million more, but I decided to keep this short and sweet.

1. Close talkers. I am a big fan of personal space, and will never understand why some people feel the need to stand *this* close to someone they are talking to. I hate the feeling of trying to inch away without being rude, only to have the person follow your lead and continue to inch closer.

2. Full-grown people that are smaller than me. I KNOW, I’m a horrible person. People cannot help their size. But I’m pretty small, so when someone is a lot smaller than me, I get really thrown off and don’t know what to do. I would like to think this is mostly because I have spent my entire life looking UP to people because I’ve always been short, so looking down at someone is just unnatural… but in all honesty it’s really just a bratty thing about me that I’d love to change.

3. When sex is talked about in a vulgar fashion. Take for instance the movie “Friends With Kids,” which Dan and I watched together a couple weeks ago. I loved it and was cracking up half the time because they did such a great job (I think) of showcasing real life. But then the last line of the movie was (spoiler alert) “Let me f*** the s*** out of you”… um, what? This was a guy that was professing his love to a girl. Really? It made me squirm, and sort of honestly ruined the rest of the movie for me. Given this explanation, it's probably no surprise to anyone that knows me that I have never seen a porn. Ever. Just the thought of it creeps me out.

4. When people ask me how much I make, or what I paid for my house, car, wedding, etc. Interestingly enough, I'm pretty willing to spill all the details on most of those things and more without much thought, but I like to do it on my own accord. If someone asks me flat out about finances, I think it's super awkward and rude, but if I decide to do it myself, no biggie.

In case anyone is wondering, just leaving this list at 4 (and not 3 or 5) was uncomfortable to me. I feel like lists are never in 4's, but I couldn't think of a 5th thing I was dying to share to anyone that wanted to read. :)

What makes you uncomfortable? Any fun plans for the weekend in store?

Thursday, May 2, 2013

Coming Soon... to a Front Porch Near You...

Guess what the hubs and I did this morning? Here's a hint -


And another hint -


One more -


Last one, I promise -


Any guesses? 

Ok I'll spill. We took a ride out to Franklin Park and picked up 5 awesome (and dusty) wood pallets, which I am planning to turn into a couch for the front porch right away this weekend. I canNOT wait. Thanks to my pal Tim, I got the pallets for a measly $2 each from his cousin's work, and by some small miracle they fit into the back of the CRV perfectly for us to bring them home. Tim's cousin loaded them into the car and the hubs unloaded them, so I have managed so far to not even get my hands dirty on this project. I genuinely expect that to change this weekend, and I am honestly really excited about it.

Next Wednesday is the latest Pinterest Challenge from Young House Love and Bower Power, which kicked me into gear a little bit on getting this done. I've been talking about doing this for ages, so I'm grateful for Tim helping me get the pallets to actually tackle it and be able to take part in the link-up again.

So, check back next Wednesday for what will hopefully be a successful unveiling of a really awesome project. If it's a total bust, I'll spray paint some jars and stick flowers in them and call that a DIY or something instead. Wish me luck.

Wednesday, May 1, 2013

If I had a Million Dollars: Spring Wish List

It's Spring!!! I mean, it's technically been spring for quite some time now, but thanks to the ever-elusive weather of Chicago, it's only just started to feel like it. It's been nearly 80 degrees for the past few days, and although it looks like that's not going to last into the weekend, it's warm enough that I feel like I can put away my sweaters, which is cause for celebration in my book since it makes the closet so much less cluttered for a few months. It's the little things.

And speaking of little things, here's a roundup of some goodies I've got my eye on lately.


striped tee  |  primer  |  necklace  |  pitcher  |  pencils  |  pillow cover  |  matches

I have $30 in credit for Bauble Bar, so I'm thinking this necklace (that will cost me just $9 after my credit and looks like it will go with ANYTHING) is in my future. The extra-long matches are becoming more and more necessary every time I try to light a candle with a normal match at home and burn my fingers (just me?), and the pillow covers are ridiculously perfect for the spring and summer, but currently out of stock. Perhaps an actual "necessity," the primer is supposed to be great for acne-prone skin, includes a clinically proven treatment for breakouts and works as a base for makeup. I have to get my makeup done for Bridget's wedding and considering I wear nothing but a BB cream each day, I know wearing foundation even just for one day will be a disaster for my skin. Thankfully, my super fashionable and makeup savvy sister-in-law filled me in on the wonders of a primer, and it sounds like this might just do the trick.